
Emailkick using integrated SES-SNS linking to access your email delivery statistics real time. Following these few steps will activate realtime statistics.
If it is not linked, you get last 15 day Statistics provided by SES API (Sometimes unreliable!)
1. Emailkick Integration URL
This URL helps in linking your Emailkick account to your AWS

- Log into your Emailkick Account
- Go to your settings page
- Click on Email Statistics
- The URL on a blue box is your URL endpoint to connect to your AWS account
- Copy the URL
2. Login to AWS and go to SES dashboard

-
Login to your AWS Account Management Console Console. If you do not have an account you can create one for free.
-
On your console, search for SES using the search bar on top. Click on the Amazon Simple Email Service option.

- Go to Domains on the Identities section on the left side of your screen

- Select the domain name, using which you will be sending emails using EmailKick.com
3. Assign a SNS Topic
Hey! While the title of the section may seem complicated, The process is simple to follow!

When you are inside the your domain page, Look for Notifications section and toggle the section.
- Click on Edit Configuration button.

- When the popup come in, Create a new Amazon SES topic by clicking on "Click here to create a new Amazon SNS topic" link as shown in the image above.

- Give a memorable topic name and display name. For example, Emailkick-connect. Click on create topic to create.
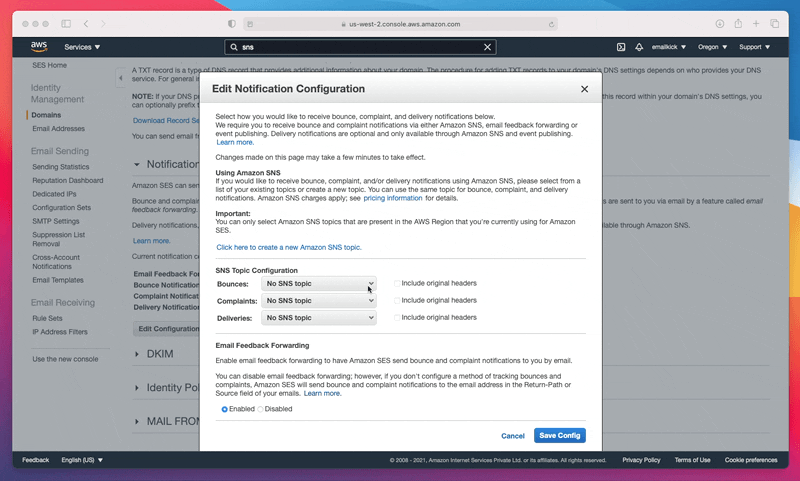
- To set the created topic to receive statistics, Find the newly created topic by clicking the boxes next to Bounces and Complaints and Deliveries.
Make sure you set the topic to all options (Bounces, Complaints and Deliveries).
- Save the Configuration.
Note
If you have an email verified on your Identity List that you use to send email, please do Step #3 to that email address identity to get sending information from that email as well.
For example, If you domain is yourdomain.com and you have hello@yourdomain.com verified, do step #3 for that email identity as well.
4. Creating a Subscription to the new SNS topic
Lets connect the newly created topic to a unique link generated by emailkick.

- Search for SNS on the top search bar of your AWS Console
- Select Simple Notification Services from the dropdown
- Next, Click on Topics from the left sidebar
- Once the page is loaded, you will find the topic that you previously created. Click on that topic's name

We now have to link this topic to a subscription. This will help SES to send message about the email delivery straight to Emailkick.
- Click on orange colored Create subscription button to create a new subscription to this topic.
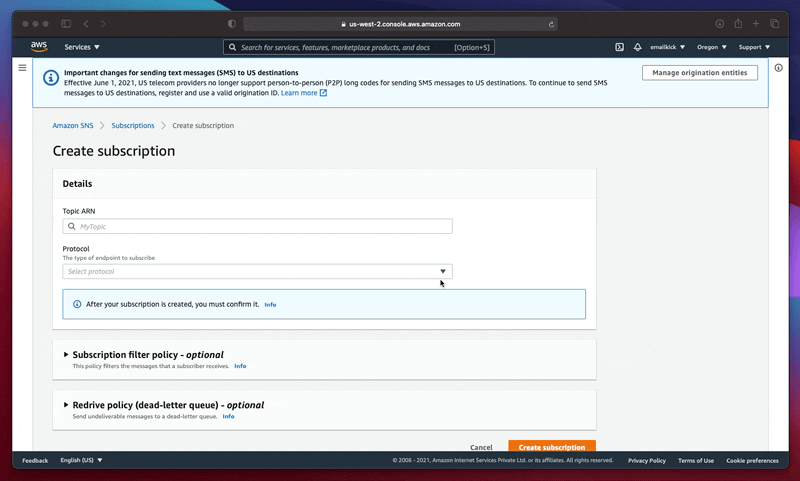
-
On the Create subscription, select HTTPS on the protocol section.
-
We need to enter a URL which we copied from the First Step
-
Finish the process by clicking the Create Subscription button on the bottom of the page.
5. Check if the linking is ready
- Open your settings page on your Emailkick Account
- Go to Email Statistics
- The indicator on the right side shows the Status of your Linkage.
| Status | |
|---|---|
| Awaiting Confirmation | Emailkick is awaiting confirmation from SES or The process is not complete |
| Linked Successfully | Emailkick is ready receive your email updates |
When the indicator shows Linked Successfully, your Emailkick account is ready to receive data from your SES account 🚀.
Design beautiful emails using Emailkick.